Export absence
An export can be useful for different purposes, e.g. for import to a payroll system or to analyse absence data in a spreadsheet.
Table of Contents
- How to export absence data
- View all registered absences for a specific time period
- View absence balance for a specific date
- Summary of registered absences for a specific time period
- Use time period picker in the export
- Export absence in PAXml format
- Export absence from dectivated users
How you export absence data
To export absence, you´ll need a System role with "Full access over absence".
- Go to the "Absence module"
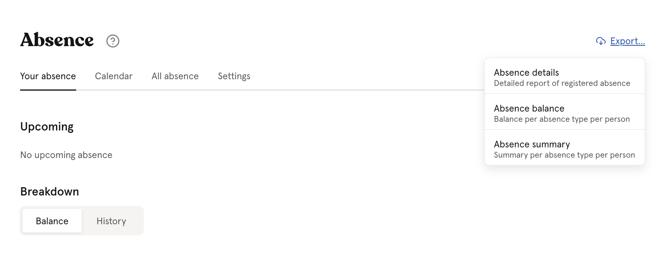
- Click "Export" at the top right corner

There are different types of absence exports
-
-
Absence Details
- Absences, including those that only partially occur within the specified time period, will be included in full in the report.
-
Absence Balance
- Only absence days that fall between the start of the absence period and the specified balance date will be included in the report.
-
Absence Summary
- Only absence days that occur within the specified time period will be included in the report.
-
- Select the Absence type, or leave empty for all
- Pick a Time period
- Select if you want to include all employees in the export, specific teams or locations, or the entire organization
- Choose if you want to export active users, deactivated users or all (not deleted users)
- Choose current statuses, or leave empty for all
- Select a format for your export: XLCX (Excel), PAXml, or Visma Lön 600.
- Click Generate report to finish. You will then receive an e-mail with the requested export.
View all registered absences for a specific time period
Selecting the Absence details export option generates a comprehensive report that outlines all registered absences during the specified time period. Absence entries, even the ones that only partially occur within the specified time period, will be included in their entirety in the report.
To set a speisific time period
- Go to the "Absence module"
- Click "Export" in the top rights corner"
- "Absence details"
- Fill out details
- In the "Time period" field, specify the range you want included in the export.
- You will receive an e-mail with the requested export.
View absence balance for a specific date
Using the Absence Balance export gives you a simple and straightforward view of the balance for your chosen absence types on a specific date. This can be especially helpful when you want to check how many days have been taken at the end of the vacation year.
To view balance for a spesific date
- Go to the "Absence module"
- Click "Export" in the top rights corner"
- "Absence balance"
- Fill out details
- In the "Time period" field, specify the range you want included in the export
- You will receive an e-mail with the requested export.
- Only the absence days occurring from the start of the absence period (for each persons absence policy) to the desired balance date will be included in the report.
- The absence balance export provides the following information
- Employment ID, Name, Email, Employment Type, Employment Percentage, Absence Type, Initial Quota, Adjusted Quota, Total Quota, Approved Days, Counted As, Occasions, Remaining Days, Balance Policy, Export Period.
Summary of registered absences for a specific time period
When you generate an Absence summary, you'll receive a consolidated overview of absence days recorded for each employee within the selected time period.
To get a summary of registered absences for spesific period
- Go to the "Absence module"
- Click "Export" in the top rights corner"
- "Absence summary"
- Fill out details
- In the "Time period" field, specify the range you want included in the export
- You will receive an e-mail with the requested export.
- Only the absence days occurring within the specified time period will be included in the report.
- The absence summary export provides the following information
-
- Employee ID, Full Name, Email Address, Employment Type, Employment Percentage, Absence Type, Approved Days, Counted As, Number of Occasions
Use time period picker in the export
In addition to selecting a custom time period, you can also choose from predefined periods
- Last year
- This year
- Last quarter
- This quarter
- Last month
- This month
Export absence in PAXml format
You can choose to export absence in a format that can be imported into another system that supports PAXml import format.
The PAXml format is only available for the "Absence details" export.
To export in PAXml format
- Go to the "Absence module"
- Click on "Export" in the top right corner
- Choose "Absence details"
- Fill out details
- Select the "PAXml format" and generate the report.
- You will receive an e-mail with the requested export. Import this file into your system.
Export absence from dectivated users
You can specify which "Account status" to include when exporting users in your report. The report will contain all users matching the selected account statuses, based on the export settings you configure.
- Active accounts
- Deactivated accounts
- All