Table of Contents
- Create a smart document
- Using a smart document as a regular word processor
- The editor — what you can do
- Formatting options
- Highlight — what it is and how to remove it
- Page breaks and more
- Add data sources to a document
- Insert smart fields
- Using smart fields — a practical example
- Paste from Word
- Save a document
- Preview a document
- FAQ
Create a smart document
- Go to the Documents module
- Click "Add document"
- Choose "Create a smart document"
- Optionally choose a template to start from, or start with a blank document
- Fill in document details, name, category, regarding and access
- Click "Create"
- The smart document editor opens and you can start writing
💡 You can also create a smart document directly from an employee's profile by going to their Documents tab and clicking "Upload document" → "Create a smart document". The "Regarding" field and access will automatically be set to that employee.

Using a smart document as a regular word processor
You do not need to use smart fields, data sources or templates to benefit from smart documents. The editor works just like a standard word processor, you can write, format and share documents without using any advanced features.
This is useful for:
- One-off documents that do not need to be reused
- Documents where you want to write and format freely without any pre-filled data
- Simple internal notes, summaries or policies
Simply open the editor, start writing and save when you are done. No setup required.
💡 If you later decide you want to reuse the document as a template or add smart fields, you can always do so. There is no commitment to a particular way of working.
The editor — what you can do
The smart document editor works like a standard word processor. The editor opens with a placeholder text:
"Start writing, paste your Word template, or insert smart fields by typing "$field name"."
You can write freely, format text, add structure and insert smart fields, all within the same editor.
Formatting options
The editor supports the following formatting options:
| Formatting | Description |
|---|---|
| Headings | Multiple heading levels for structuring your document |
| Bold, italic, underline | Standard text formatting |
| Strike-through | Cross out text |
| Subscript and superscript | For footnotes, chemical formulas and similar |
| Bullet list | Unordered list |
| Numbered list | Ordered list |
| Block quotation | Highlighted quote block |
| Highlight | Yellow marker for text that needs attention or follow-up |
| Link | Add a hyperlink to text |
| Horizontal rule | A visual divider between sections |
| Emoji | Insert emojis by typing : followed by a search term |
💡 YouTube and Vimeo videos cannot be embedded in smart documents, only in news articles and handbooks.
Highlight — what it is and how to remove it
Highlight (yellow marker) is used to mark text that requires attention, needs to be filled in, or should be reviewed before the document is finalised. It is commonly used in templates to indicate where information should be added or customised.
To remove highlighting:
- Select the highlighted text
- Click the highlight icon in the toolbar
- The yellow background is removed
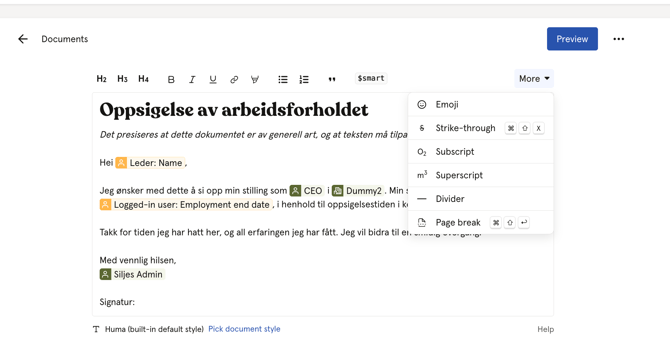
Page breaks and more
Insert a page break to control where a new page starts when the document is printed or saved as a PDF.
- Place your cursor where you want the page break
- Click "More" and "Page break"
💡 Click "More" to see other editor options
Add data sources to a document
Before you can insert smart fields, you need to add data sources to the document. A data source defines which person, company, team or location the smart fields should pull data from.
- Open the smart document
- Click "Data sources" in the right panel
- Click "Add data source"
- Choose the type — User, Company, Team or Location
- Give it a descriptive label — for example "New hire", "Manager" or "Company"
- Click "Save"
- The data source appears in the panel — click on it to assign it to a specific person, team, location or company
💡 You can add multiple data sources of the same type — for example both "New hire" and "Manager" as User data sources. Each gets its own label and can be assigned independently.
⚠️ If a data source is referenced in the document but no longer attached, the smart field will show as a detached placeholder. Either reattach the data source or replace the field with plain text.
Insert smart fields
Smart fields automatically pull in data from Huma — such as an employee's name, position or salary. To use smart fields, data sources must first be added to the document.
There are two ways to insert a smart field:
-
By typing
Type $ followed by the field name or data source name — for example $name or $organization. A list of matching fields will appear for you to select from.
-
Using the toolbar
Click "Insert smart fields" in the toolbar and select from the list of available fields grouped by data source.
💡 In a template, smart fields show as placeholders. In a document, they show the actual value, provided the data source has been assigned to a specific person and you have access to the data.
🔗 Read more about smart documents and data sources.
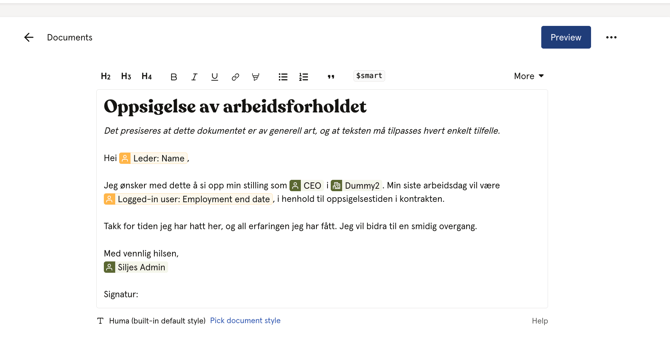
Using smart fields — a practical example
Here is a practical example of how to create a personalised employment contract for a new hire:
- Open the smart document or create a new one
- Click "Data sources" and add a User data source labelled "New hire"
- Click on "New hire" in the data sources panel and assign it to the relevant employee
- In the document, type $ to insert smart fields — for example $New hire name, $New hire position or $New hire start date
- The fields will automatically fill in with that employee's data
- Review the document and manually fill in any information that could not be pulled from Huma
- Save the document and optionally store it as a PDF or send it for digital signing
💡 If a smart field shows a placeholder instead of a value, either the data source has not been assigned to a specific person yet, or the relevant data is missing from their profile in Huma.

Paste from Word
You can paste content from a Word document directly into the editor. Huma will attempt to preserve the formatting.
For best results, paste as plain text first and reapply formatting in the editor:
- Mac: Cmd + Shift + V
- PC: Ctrl + Shift + V
- Or right-click in the editor and select "Paste without format".
💡 Pasting with formatting preserved may sometimes result in unexpected styling. If this happens, paste as plain text and reformat manually.
Save a document
Smart documents do not save automatically. You must save manually by clicking "Save" in the top right corner of the editor.
⚠️ If you generate a PDF before saving unsaved changes, Huma will warn you that the smart document and the PDF may not match. We recommend always saving before generating a PDF.
Preview a document
You can preview how the document will look before sharing or saving as a PDF.
- Click "Preview" in the top right corner of the editor
- A read-only preview of the document opens
- Close the preview to return to editing
💡 The preview shows the document with smart fields filled in, giving you a realistic view of how it will appear to the recipient.
FAQ
Can I undo changes in the editor?
Yes. Use Cmd/Ctrl + Z to undo, and Cmd/Ctrl + Shift + Z to redo.
Can I add images to a smart document?
No. Images cannot be inserted into smart documents at this time.
Can I add tables to a smart document?
No. Tables are not supported in the smart document editor at this time.
Can multiple people edit a smart document at the same time?
No. Smart documents do not support real-time collaborative editing. Only one person should edit the document at a time.
What happens if I close the editor without saving?
Unsaved changes will be lost. Always save before closing the editor.
Can I see who last edited a smart document?
Yes. The document details show when the document was last updated and by who